• Facebook Tips
How to Install Facebook Marketplace Nearby Me App, How to Make Facebook Fan Page, How to Delete All Facebook Search History on FB , How to Login Instagram with Your Facebook , Marketplace Facebook Buy and Sell within Local Community – Marketplace Facebook Buy Sell , How to Deactivate FB Account Temporarily on Facebook, How to Find Blocked Facebook List to Unblock blocked Friends , How to Use the “Nearby Me Friends” FB Feature on Facebook , Facebook Customer Care Center & Email Help Supports Contact Addresses , How to Install Facebook Farmville Games

How to Delete Or Close My Facebook Account Right Now | Facebook Delete Option - Block and Cancel FB Profile Permanently

 1 comment   

How to Delete Or Close My Facebook Account Right Now | Facebook Delete Option - Block and Cancel FB Profile Permanently: While Facebook remains is a useful handy tool for keeping in touch with families, friends, events organization, etc..., we should also keep in mind that it has become bigger and far too powerful than the small social site many of us originally signed up to. As such, if you feel like quitting Facebook, the decision is solely yours especially if you don't know your way around some basic Facebook settings.


How to Delete Or Close My Facebook Account Right Now | Facebook Delete Option - Block and Cancel FB Profile Permanently


Facebook has at many instances been called out for a wide range of perceived misdemeanors. In some situation, it's long been viewed as a rather sinister threat to privacy and criticised for its tax practices, but more recent issues, such as the spread of fake news, the site’s approach to illegal content and incredibly disturbing uses of Facebook Live are particularly troubling.
Howbeit, for many, it’s simply a colossal waste of time.

Regardless of why you want to cut ties with Facebook, here’s how to deactivate and delete your account now.

Deactivate

Unless you’re absolutely sure you want to get rid of your Facebook account once and for all, we’d recommend going down the deactivation route.
Deactivating your account hides your profile from friends and search, but allows you to resurrect your account – complete with friends, updates, pictures and Likes – if you ever decide to return, simply by entering your login information.
To deactivate your Facebook account:
  • Click the downwards-pointing arrow in the top-right corner of the screen
  • Select Settings
  • Open the Security section
  • Choose the Deactivate Your Account option at the bottom of the menu 

Smart Links:

  • Deactivate and Reactivate your Facebook Account
  • How to reset or change Facebook Password


Delete Facebook Now

Deleting your account is a major step, so think it through before committing. Facebook can take up to 90 days to process account deletion requests, but once your account's gone, it’s gone.
Before taking the plunge, it’s well worth downloading a copy of the data Facebook has on you.
To do this:
  • Click the downwards-pointing arrow in the top-right corner of the screen
  • Select Download a copy of your Facebook data
Once that’s done, you’re ready to delete your account. Bear in mind, however, that your sent messages will continue to exist even when all other traces of your account are gone.
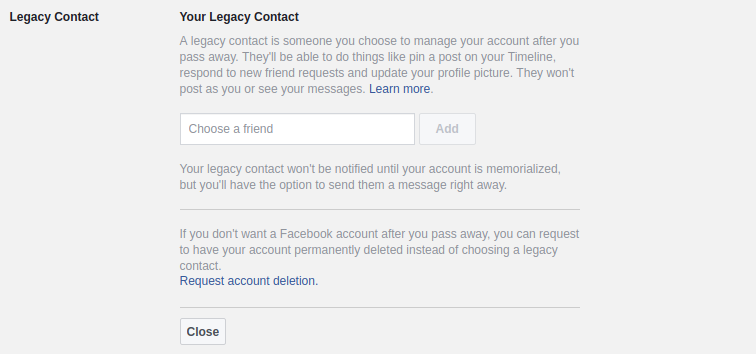
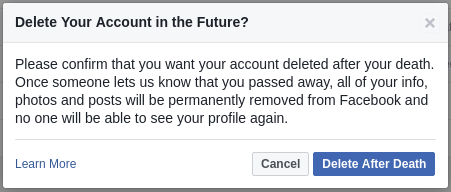
To permanently delete your Facebook account:
  • Head to Facebook’s Delete Account page: https://www.facebook.com/help/delete_account
  • Select Delete My Account
Source: www.independent.co.uk/topic/facebook-live

I hope you were able to get rid of Facebook with the help of this article. Please share it!!!
    Read More
    • Share This:  
    •  Facebook
    •  Twitter
    •  Google+
    •  Stumble
    •  Digg

    Blocking And Unblocking Friends on Facebook With Video | How to Block Or Unblock Someone on FB

     1 comment   

    Blocking And Unblocking Friends on Facebook With Video | How to Block Or Unblock Someone on FB: Are you sick and tired of some friends or you have settled your score with a friend and you want to get along. This guide is gonna help you on how to go about blocking and unblocking Facebook users.

    Blocking And Unblocking Friends on Facebook With Video | How to Block Or Unblock Someone on FB


    Note: Blocking a friend will automatically unfriend the person. Unblocking on a friend does not automatically add the person to your friends list.

    So, if you want to unblock a user and wants the person to appear on your friends list - you should send them a new friend request.

    Attached below is a video explaining how to block and unblock a person.

    Don't worry, this is the latest Facebook settings for blocking and unblocking users.


    Please share this article.

    Read More
    • Share This:  
    •  Facebook
    •  Twitter
    •  Google+
    •  Stumble
    •  Digg

    Free Install messenger app | Get Free messenger app Installation

     1 comment   

    Free Install messenger app | Get Free messenger app Installation - Facebook has been around for a long time, helping us connect to old friends, make new friends, advertise our goods online, get our needs met by those who professional and able enough to do so. 

    In fact, the importance of Facebook is innumerable as we find that over one billion people are on Facebook. 

    So, it is wise to say that the Facebook team is always looking for ways to optimize our satisfaction, hence, it comes up with updates from time to time and sometimes, each update can come with an additional feature or option. Take a look at some of the features below:


    1. STORIES:

    You can choose to play all of your friends' stories without having to tap it one after the other with the option ''Play All''

    2. FRIEND REQUEST:

    When you get a friend request, you are allowed a preview of that person's photos in case you can't recognize the name or the person in the current profile picture.

    3. NOTIFICATIONS:

    Your notifications are arranged in a chronological order and demarcates ''New'' down to ''Earlier'' which are the older notifications. You can now locate which notification to open.

    4. POSTS:

    You can choose to save, give feedback hide or turn off notifications for a particular post, unfollow the person who made the post or copy the link of the post by tapping on the three dots (...) at the top of the post.

    5. CAMERA:

    The camera feature has so many new options to choose from when taking a picture. Options ranging from having flowers or a crown on your head, using a STAR WARS frame, etc.

    6. CRISIS RESPONSE:

    Incorporated into this new update  is ''CRISIS RESPONSE''. It can be found under ''Favorites'' when you tap on the menu button at the right hand corner of the page. CRISIS RESPONSE shows you the crisis going on around the world.

    7. WHATSAPP:

    Tapping on the ''whatsapp'' option takes you straight to your whatsapp.


    So, check out how to download | update your Fb for Android and iPhone to enjoy

    Download and Update FB App On Android Phones From Google Play Store

    To download or update FB app from google play store is very easy and simple so just follow the procedures written below to download or update the app on your mobile app.
    • Click on ''download'' or ''update'' FB app on your device now.
    • Then click on install, that’s all.
    • Go to your apps menu and open the newly installed FB app.
    • Then fill your Facebook details to sign in, and enjoy your chat.

    Download and Update FB App on iOS From Apple Store for iPad and iPhone

    • Visit Facebook official iOS link to download and install FACEBOOK App on iPhone or iPad by clicking Here or Here.
    • On the page that appears, click on “Get App”. 
    • Follow the steps and install your Facebook App.
    So, what are you waiting for?  Download | Update your Fb for Android and iPhone to enjoy more awesome features!
    Hit on the share buttons so your friends will know what's happening
    Read More
    • Share This:  
    •  Facebook
    •  Twitter
    •  Google+
    •  Stumble
    •  Digg

    Facebook Marketplace Community – Buy and Sell On Facebook Market place Community

     2 comments   

    Facebook marketplace community the center of business transactions on the using an online procedure with the aid of phone devices. The word community sounds like the services rendered in my location. Yes, the marketplace is featured in your location and available to any users that access the Facebook website to communicate with other users. Looking for a friendly gift item or looking for a way to buy a lovely gift present for your love. Or perhaps you have some items or old stuff you consider sell to make profits and you don’t know what to do.
    Facebook Marketplace Community - Buy and Sell On Facebook Marketplace Community
    Other services platform that does the same services but the Facebook marketplace community is a fascinating and easy way to sell and buy items. On their services, you don’t get to meet the seller but the items are sold between your ranges. Meaning you can see the seller also chat up with him/her.
    Facebook marketplace community is already extending its platform in countries like Brazil, Austria, Canada, Philippines, Poland, India, France, Germany, Greece, and Denmark. Which was formally in countries such as UK, USA, New Zealand, and Australia. You can a take a look at how the services in turning into a global marketplace. The advantage of selling on the services allow your item to be view on the website which allows buyers to visit and purchase an item.
    The concept allows users to develop the sense of business structures. By accessing the marketplace community you have the ability to buy and sell also even discover new things within your local community. The only problem with the services is that the concept of meeting people might be stressful. Another benefit giving to the users that users on the platform don’t have to pay a penny for using the services. Do you know how its work?

    How does the Facebook Marketplace Community Work

    The concept of the services is very simple and easy through the use of your Facebook account detail. Community members that want to use the services required to create a Facebook account. Using your account information from the user’s profile to displayed and control your location in that community. Note that users must be above 18 or up also uses and Android devices and iPhone 5 upward.
    The marketplace comes with an icon once you click the icon it will show you the arrangement of items for that is begin sold on the services. Also, allow users to select their own goods they want to sell as well. Once the buyer spots an item and wants to make a transaction. The use of the Facebook messenger allows buyers to contact the seller and agree to make the deal. Using the Facebook messenger for transaction process doesn’t charge a fee on the platform when you decide to access the marketplace.

    How to Access the Facebook Marketplace Community

    The Facebook marketplace community provides two functions to buy and sell. On these part of the main focus on the services. Am giving you the opportunity to have an idea in selling and also buying of items. Get to know more about the Facebook marketplace community now to sell and but different items by following the method below;

    Buy on the Community

    • Open the Facebook mobile app.
    • Enter your email and password.
    • Click on the marketplace icon. The icon is like a house logo with a blue roof on the head.
    • Spotted an item you like then click on the item image.
    • Click “message seller”
    The seller will reply you back and you can decide on how to meet up for your delivery. Note that you need to check the seller detail before buying any items.

    Sell on the Community

    Note that selling on the marketplace means that you have accepted the community standard policy. Which mean that there are items you can sell on the services.
    • Click on the marketplace icon.
    • Tap on what to sell.
    • Upload the picture of the product you are selling.
    • Add a short story on the item.
    • Enter the prices and location.
    • Then click save to delivery.
    The Facebook marketplace community is a better and convenient way to perform your daily shopping activities with the app on your Android or iPhone. Note that the marketplace hasn’t been introduced on the PC or the Mac and Linux.
    Read More
    • Share This:  
    •  Facebook
    •  Twitter
    •  Google+
    •  Stumble
    •  Digg

    Sign Up Instagram With Facebook Or Email | Login Instagram through Facebook

     2 comments   


    You’ve heard all the reasons why Instagram is a great tool for small businesses. Maybe you’ve even signed up for Instagram for personal use.

    But do you know what it takes to set up an Instagram for your business?


    Here are 10 things you need to do first:


    Want to try email marketing for your business? Sign up for your free 60-day Constant Contact trial here.
    1. Download the app

    Instagram is different from other social networks in that it is primarily a mobile platform.

    Once your account is set up, you will have a page that can be viewed on desktop, but the majority of your activity will take place within the mobile app.

    Click here to download the app.
    2. Choose a recognizable username

    You can sign up for Instagram with an email address or a personal Facebook account.

    Once you sign up, you’ll be asked to choose a username.

    Your username will display publicly and will be what people see when they find you on Instagram. Make sure the username you choose is recognizable and is as close to your business or organization’s name as possible.

    When signing up, Instagram will also ask for your full name. Here, you can put your full business name which will make it easier for people to find you through Instagram’s search function.
    3. Update your profile

    Instagram lets you fill out a 150 character bio about your business. Because of the text limitations, you’ll want to be clear and concise about who you are and what you offer. If you serve a local customer base, you’ll also want to add your location.

    Constant Contact uses the bio to share our mission, and let people know what types of photos we share from our Instagram account:


    You can also add your business’s website, which users will be able to click to visit right from their mobile device.
    4. Add a recognizable profile picture

    The perfect Instagram profile photo will be 400×400 pixels.

    But what’s most important is that the photo you choose is recognizable to people who know your business. In most cases, the best choice will be your business’s logo.

    Your profile photo can only be updated on a mobile device. If you don’t have your logo saved to your smartphone or tablet, Instagram has the option to import it from Facebook or Twitter.


    You can also take a new photo with Instagram.
    5. Research

    It might not sound fun, but without having a good understanding of the type of pictures others are posting, you won’t know what content tends to do well. And lucky for you, Instagram research is less staring-at-piles-of-data-wearing-a-lab-coat kind of research, and more look-at-pretty-pictures kind of research.


    See Also:
    • Facebook Full Site Login iPhone
    • How To Get 10000 Followers On Facebook Fast And Fr...
    • Fb History
    • Delete My Instagram Account Without Password

    Start by finding a business in your industry who has a hefty Instagram following and high levels of engagement. What do they tend to send, and when do they tend to send it?

    Even if you want to differentiate yourself from the competition, it’s essential that you know what others are doing.
    6. Post your first photo

    Okay, now that your profile is set up, it’s time to take your first photo.

    Here’s a quick run-through of how Instagram works:

    First, click the icon on the bottom in the middle of the screen.


    You can either take a photo by pressing the circle in the middle of the screen, or click “library” on the bottom left to upload a photo of your own.

    Note: “Video” on the right enables you to take a video up to a minute.


    If you’re uploading a photo, you will have the option to crop it first. After that, you’ll have options for different enhancements.

    You can choose from a number of filters that scroll across the bottom of the app. (Double tap the filter to add a border or alter the strength of the filter.

    You can also click “edit” to access a number of other photo editing features.

    Once you’re happy with your photo, hit NEXT in the top right of the screen. Here, you’ll be able to add a caption.

    You can also tag people and name the location.

    7. Setting up your location

    When you click, Add Location you will see a list of previously used locations in your general area.

    If you have a brick and mortar location, you may see that someone has already named your location. If your store, restaurant, or office hasn’t been named, you can name it yourself.

    After your photo is posted, you will see the location name in blue. When you click on your location name, you’ll be able to see every photo that has been tagged there. This can be a great resource for seeing what people like and want to share about your business.

    8. Tell people you’re on Instagram

    Leverage your existing channels to let people know your business is on Instagram.

    If you have an email list, you can send out an announcement and ask readers to follow you. Constant Contact integrates with Instagram, so you can easily upload your Instagram images to your email marketing account.


    New to email marketing? Try Constant Contact for free! Sign up for your 60-day free trial. 
    9. Follow others

    Instagram’s search function makes it easy to find people and brands to follow.

    You can search by username, or choose a hashtag that may be relevant to your business.

    Following more people and businesses is a great way to make new connections and can also provide inspiration for your Instagram account.
    10. Get social

    You’ve set up your account, learned the basics, and found the right people to follow; now you’re ready to start building a presence for your business on Instagram.


    See Video:

    A key component of building an audience on Instagram is engaging with the people who follow you. When someone likes or comments on your photo, you will receive a notification.

    You can respond within the comments of a photo by including the “@” symbol, followed by their username.

    You will also receive notifications when someone tags you in a photo. You can view all of the photos you’ve been tagged in, on your Instagram profile.


    Stay on top of the all the latest social media and email marketing trends! Sign up for our Hints & Tips newsletter to get our best blog posts delivered to your inbox twice each month.


    Related Posts:
    • How To Add Pics On Pinterest
    • Facebook Party
    • Craigslist Cities Usa
    • How To Change Your Name On Fb
    • Booking In A Hotel
    • How Do You Access Archived Messages On Facebook
    Read More
    • Share This:  
    •  Facebook
    •  Twitter
    •  Google+
    •  Stumble
    •  Digg

    How To Find Your Archived Messages On Facebook Messenger

     1 comment   

    How To Find Archived Messages On Facebook Messenger: Is there really a way of recovering your archived messages on Facebook messenger? I think there is and that's why I'm writing this article right now.

    We are going to be using two device (Android and iPhone) to demonstrate how to find your archived messages on Messenger.
    How To Find Your Archived Messages On Facebook Messenger


    Key terms: how to unarchive messages on messenger app, how to view archived messages on facebook messenger android, how do i find my archived messages on facebook messenger, how to delete archived messages on messenger, how to see archived messages on whatsapp, how to see archived messages on messenger app iphone, where is the more button on messenger, how to get an archived chat back on messenger.


    See Also:
    • How To Block Messages On Facebook Without Blocking...
    • Facebook Login Home Page Log Out
    • Google Facebook Account Login
    • Create My Facebook Page

    How To See Archived Messages On Facebook Messenger - Using Android.

    1. Open the Facebook Messenger App. Facebook Messenger is a blue speech bubble icon with a white lightning bolt in it.

    2. Tap House. It's the icon that appears like a home, and it seems on top left corner simply under the search bar.

    3. Press and hang on a discussion. Doing so will expose a pop-up menu.

    4. Tap Archive. The discussion will be relocated to the "Archived" folder.

    5. Tap the blue speech bubble icon. It remains in the bottom-right corner of the screen, and doing so will begin a brand-new discussion.

    6. Key in the recipient of your archived discussion.

    7. Tap on the recipient's name. You will now see the archived messages from the discussion appear in the chat window. 

    How To Find Archived Messages On Facebook Messenger - Using iPhone.

    1. Open the Facebook Messenger App. Facebook Messenger is a blue speech bubble icon with a white lightning bolt in it.

    2. Tap House. It's the icon that appears like a home, and it seems in the bottom left corner of the screen.


    See Video:

    3. Swipe left on a discussion to expose your alternatives.

    4. Tap More. It's the gray button with three horizontal lines stacked on top of each other.

    5. Tap Archive. The discussion will be relocated to the "Archived" folder.

    6. Tap the blue "+" icon. It lies in the leading right corner of the Messenger screen. Doing so will begin a brand-new discussion.

    7. Enter the recipient of your archived discussion.

    8. Tap on the recipient's name. You will now see the archived messages from the discussion appear in the chat window.

    Hope this Facebook tutorial was explanatory. If are still having any complain, please leave a comment. Also see other useful pages below:


    Related Posts:
    • How To Reset Instagram Password Without Email or F...
    • How To Edit Name on Facebook Account
    • Desktop Facebook Sign in
    • Change Password Facebook Messenger
    • Can I Tell Who Blocked Me On Facebook
    • Please Logout My Facebook Account
    • Yahoo M
    Read More
    • Share This:  
    •  Facebook
    •  Twitter
    •  Google+
    •  Stumble
    •  Digg

    Automatic-Delete Your Facebook account after your death

     1 comment   

    How to Auto-Delete Your Facebook account after your death? Were you suddenly reminded of your mortality and how you are not doing enough for the world. I just did today is not the day. This post will show you how to set an auto delete for your facebook account after you die.
    auto delete facebook account
    Now, if you don’t want to keep your Facebook account alive after your death, you can get it deleted automatically after you pass away. Here are the steps to do so:
    1. Sign-in to your Facebook account.
    2. Click the down arrow near the Home button.
    3. Click Settings in the drop-down menu.
    4.  Click General on the left-hand side.
    5. Click Manage account.
    6. Click Request account deletion.
      Delete Facebook Account after Death 1
    7. Click Delete After Death.
      Delete Facebook Account after Death 2
    Facebook will delete your account including all the data present in it after someone notifies them about your death.

    Facebook is probably the most popular of all such platforms. It has appropriate options which allow a deceased person’s Facebook profile to be memorialized – the ones with Remembering written – after getting a request from a verified person.
    A friend or a family member can either initiate,
    1. A memorialization request:
      https://www.facebook.com/help/contact/234739086860192
    2. An account deletion by a special request for a deceased person’s account:
      https://www.facebook.com/help/contact/228813257197480Note: A proof of death is required.
    A person can select Legacy Contacts for their Facebook account. Legacy contact can do basic tasks – once the account has been memorialized – like writing a pinned post, respond to friend requests, and update the profile picture and cover photo. However, they can not Login into the memorialized account, change any other information, read chats with other friends, etc. If there is no Legacy Contact attached to an account, no one will be able to make any changes.
    source: https://fossbytes.com/how-to-auto-delete-your-facebook-account-after-your-death/
    Read More
    • Share This:  
    •  Facebook
    •  Twitter
    •  Google+
    •  Stumble
    •  Digg

    How can I delete or deactivate my Facebook account immediately?

     1 comment   


    How can I delete or deactivate my Facebook account immediately?
    : 
    You can deactivate or delete your Facebook account because you own every right to your Facebook account and so can decide to deactivate or  delete your account anytime. We’ll show you how you could easily delete or deactivate your FB account.
    See: How to Delete Facebook Group
    When it comes to quitting or leaving Facebook, there are usually two choices you need to choose from: Either choose to delete your Facebook account permanently or deactivate your FB profile temporarily.Each of the above choices depends on your reason for wanting to leave Facebook. It’s recommended that you Deactivate Facebook account if you have intention of continuing Facebook later in life.
    You should Delete Facebook account if you are truly certain that you won’t be needing your Facebook account in the future.
    Below are the quick differences that exist between Facebook deactivation and deletion for you to check out.

    Difference between Deleting a Facebook account and Deactivating a Facebook Account?

    In order to know which option is suitable for you, you need to understand
    If you deactivate your account:
    • You can reactivate whenever you want.
    • People can’t see your Timeline or search for you.
    • Some info may remain visible (example: messages you sent).
    If you delete your account:
    • You can’t regain access once it’s deleted.
    • We delay deletion a few days after it’s requested. A deletion request is cancelled if you log back into your Facebook account during this time.
    • It may take up to 90 days to delete data stored in backup systems. Your info isn’t accessible on Facebook during this time.
    • Some things aren’t stored in your account. For example, a friend may have messages from you after deletion.
    • Copies of some material (example: log records) may remain in our database but are disassociated from personal identifiers.

    Typically, if you intend to deactivate your account on Facebook, you are advised to login to your Facebook account on a web browser and visit this web address: www.facebook.com/deactivate.php
    Same is applicable to deleting your Facebook account but in this case, you are advised to visit m.facebook.com/account/delete on your web browser.
    See: How to Permanently Delete a Facebook Account On Android Device
    Please share this article and don’t be a shellfish – sharing is caring!😂😂
    Read More
    • Share This:  
    •  Facebook
    •  Twitter
    •  Google+
    •  Stumble
    •  Digg

    How you can Deactivate and Reactivate your account on Facebook

     1 comment   


    Updated post on How you go about deactivating Facebook Account Temporarily
    How you go about deactivating Facebook Account Temporarily: There comes a time when you just want to quit doing something. Sometimes
    not because those things are bad but you don’t just feel like doing it any longer.
    Your spirit doesn’t just like it and so, you have to do-away with it.

    To temporarily deactivate your Facebook so that you can re-activate it whenever you feel like, follow the tips underlined below:
    Deactivate Facebook Account Temporarily - Step by Step

    How to Deactivate Your Facebook Account Step by Step

    Facebook users can decide to deactivate their FB account temporarily and choose to come back whenever they want.
    To deactivate your Facebook profile account, follow the steps below:
    1. Click the account menu at the top right of any Facebook page
    2. Select Settings
    3. Click General in the left column
    4. Choose Manage your account then follow the steps to confirm
    If
    you deactivate your account your profile won’t be visible to other
    people on Facebook and people won’t be able to search for you. Some
    information, such as messages you sent to friends, may still be visible
    to others.
    If you’d like to come back to
    Facebook after you’ve deactivated your account, you can reactivate your
    account at anytime by logging in with your email and password. Keep in
    mind, if you use your Facebook account to log into Facebook or somewhere
    else, your account will be reactivated.
    This means your Facebook
    profile, including things like your friends, photos and posts, will be
    completely restored. Remember that you’ll need to have access to the
    email address you use to log in to reactivate your account.
    If you find these guide confusing please leave a comment or check out
    our previous articles
    Read More
    • Share This:  
    •  Facebook
    •  Twitter
    •  Google+
    •  Stumble
    •  Digg

    How to View And Unblock My blocked Facebook friends Right Now

     1 comment   


    Welcome, here is our post on How to View And Unblock My blocked Facebook friendsRight Now. Continue reading it below:
    A fast way to View & Unblock My blocked Facebook friends Right Now: Perhaps you had blocked your friend deliberately or erroneously and you want to reverse that action, all you have to do is to unblock that friend. So, do you want to know A fast way to unblock your own personal Facebook friend? We’ll be showing you in a jiffy.

    A fast way to Unblock My blocked Facebook friends

    Article Source

    A fast way to Unblock Your blocked Facebook friends On A Facebook Application

    1. Tap on the menu button on the top of your own personal Facebook page
    2. Scroll down to Account Settings
    3. Tap on “Blocking”  to show you a list of your blocked friends
    4. On the extended right of the name of the person you want to unblock and tap on “Unblock”
    5. On the screen that pops up, you will be asked if you are sure you want to unblock the person, tap on “Unblock”

    A fast way to Unblock My blocked Facebook friends On A Browser 

    1. Click on    in the top right of your own personal Facebook page
    2. Click on “Privacy Shortcuts”
    3. Click on “How do I stop someone from bothering me?”
    4. Click on “View All Blocked Users”
    5. Click on “Unblock” next to the name of the person you want to unblock.
    6. On the pop-up screen, you will be asked if you want to unblock the person, click on “Confirm” at the bottom of the pop-up screen to unblock that Facebook friend.

    Please share this article “A fast way to Unblock My blocked Facebook friends”…

    please share this(How to View And Unblock My blocked Facebook friends Right Now) on facebook and all??
    Read More
    • Share This:  
    •  Facebook
    •  Twitter
    •  Google+
    •  Stumble
    •  Digg
    Newer Posts Older Posts Home
    How to Install Facebook Marketplace Near Me App

    How to Create a Facebook Business Page

    How to Completely Delete Facebook Search History

    How to Sign in or Login Instagram with Your Facebook

    Marketplace Facebook Buy and Sell within Local Community – Marketplace Facebook Buy Sell App

    How to Deactivate FB Account Temporarily on Facebook

    How to Find Blocked Facebook List to Unblock blocked Friends

    How to Use the “Near Me Friends” Facebook Feature

    FB Customer Care Center & Email Help Supports Contact Addresses

    How to Install & Play the Facebook Farmville Games

    Enter your email address:

    Other resources

    • Facebook open graph debugger
    • How to delete Facebook account permanently

    Blog Archive

    • ▼  2019 (139)
      • ►  March (129)
      • ▼  January (10)
        • How to Delete Or Close My Facebook Account Right N...
        • Blocking And Unblocking Friends on Facebook With V...
        • Free Install messenger app | Get Free messenger ap...
        • Facebook Marketplace Community – Buy and Sell On F...
        • Sign Up Instagram With Facebook Or Email | Login I...
        • How To Find Your Archived Messages On Facebook Mes...
        • Automatic-Delete Your Facebook account after your ...
        • How can I delete or deactivate my Facebook account...
        • How you can Deactivate and Reactivate your account...
        • How to View And Unblock My blocked Facebook friend...
    • ►  2018 (9299)
      • ►  December (7)
      • ►  November (646)
      • ►  October (90)
      • ►  September (64)
      • ►  August (17)
      • ►  July (97)
      • ►  June (253)
      • ►  May (1200)
      • ►  April (1343)
      • ►  March (3502)
      • ►  February (1733)
      • ►  January (347)
    • ►  2017 (814)
      • ►  December (814)
    • Disclaimer
    • Contact

    Copyright © Facebook Tips